‘nids part 272 – Tyranid VSG part 3

Dreadtober starts tomorrow, but I mentioned the other day I had been sculpting the Tyranid Void Shield Generator and so thought I’d just slip this in before I can start sharing my Dread progress. I had been putting the VSG off, for over 3 years now, purely because I wanted to video how to do some of the tendon bits. I finally did the clip and I desperately want this complete, but among so many other projects Dreadtober included there’s quite a competition for my limited hobby time.

Here’s how I sculpt a tendon:

And static shots from the completed spine in the video.

The inner spine is [almost] complete though.

It’s not perfect by any stretch but after the gloss and Tamiya Clear Red X-27 it doesn’t have to be.

My next stumbling block is how it interfaces with the ground. I was going to use some of the wood chips I used on my ‘ground-bursting’ Trygon but I still need to add some lava stones to look like alien growths. It’s a fair bit of work and not without challenges, hence why it has almost caused my renewed efforts to stall…

The emitter node also needs adding to the pen tube so I can then add veins and whatnot before I then try and sculpt the inside of the battlements. 

The black mark is for one extra tendon that needs to be sculpted in place. I’ve got some concept elements for the battlements – which is an odd situation as in 8th edition the building rules are far more streamlined now with less room for interpretation. It’s still possible to position models in the standard Imperial VSG but nowadays this would probably be considered modelling for advantage. 

I mean I did specifically build it to fit a brood of Devgaunts in but that was perfectly legitimate with the prescribed rules in 7th. Anyway, I doubt it’s ever going to a tournament so it’s not really an issue.

Anyway, not sure when/if I’ll do some more on this, Dreadtober is my focus but I will have some extra hobby time between writing this and it’s scheduled publish date, so I might have one update soonish or none for six months to two years…😂

Terrain is everything – Ferron Fire Firs

My last update on these was April 2018. They’ve essentially sat in a box untouched until now. Other projects take priority and terrain often falls by the wayside. Frustratingly not a lot needed doing to complete them – the Red Planet BASE! and some additional highlights on some of the trees for variety.

I did my Red Planet BASE! highlights, I also did all the Genestealer Aberrants, Hive Guard, Rippers, Termagants, Tyranid Warrior and Redemptor Dreadnought while I was at it – you see that’s the advantage of the Big Build programme, it allows you to get them ready for basing.

I then did the extra highlights of the mid-yellow [lemon] and then threw on some white for super hot streaks of combustion. Hopefully they’ll fit in with the other set I’ve done previously, although the very reason for the extra highlights is variety so not sure how ‘fitting in’ is supposed to manifest itself as I’ve expressly painted them different…

Wraithbone chips next and then a quick varnish. I actually have once of those cheap spray-can car varnishes so I decided to give it give a go. It seemed the easiest way even if the soft cover makes varnish almost redundant. The red trees are from the first set I bought, where I didn’t paint the big trees because I thought they were too big – this was before LoS for Knights was needed, so I’m finishing these off too.
The clear lacquer did alright and the ‘bottle brush’ feels slightly more substantial know because of it. 
However, it is glossy, which for the trees I actually like.
But for the bases I don’t.
Protection wise I’m satisfied but I’ll be painting all the bases with my Winsor & Newton Matt Varnish. Not only will this add more protection where this terrain is prone to damage but also supply the finish I’m after.
It’ll be dull ‘drone’ work, that I’m not particularly looking forward to but it’s just the one last step and I can tick it off my To Do List as a great start to the new season – terrain ✔️, quantity ✔️, long time in production ✔️
I also picked up a couple of extra art acrylics, so I’ve got my infra-red spectrum going here. I need another can of clear lacquer to varnish up my first set of trees to the same level of protection but typically Home & Bargain is out of stock.

Terrain is everything – Sanctum Imperialis – TO DONE!

Aah the Sanctum Imperalis… It’s taken a while to get the opportunity to take pictures but I needed some to add to last season’s hobby review.

It’s a big piece and so it’s a struggle to fit it into my homemade light box but I got there in the end.
As you may recall this was a project not without challenges, in particular the ‘bold’ choice of full verdigris on buttresses, supports and skirting boards.
The red glass lighting also suffered from a lack of contrast that I repeated on my Ravenwing Dark Shroud – sometimes Tamiya Clear Red X-27 is too good.
But the colour choices were made to stretch me, to do something more challenging than just the weathered brassy bronze and as you can see the Ferron Proxima background finally gives it the context it needed.
On the full red/orange background the verdigris provides the ideal framework to break up the monotony of the red rockcrete walls.
With the cream interior adding another dimension.
I can’t wait to eventually see these used on my Realm of Battle board, although that could be a long time hence.
I had plans to add some creeping yellow flock up the walls and around the buttresses but didn’t get round to it.
I did get the occasional propaganda poster in though 😉
And the white background pics, which aren’t totally without merit.
At least it matches the interior a bit, there’s consistency and sense of reason that grounds the turquoise.
But as I’ve maintained buildings in real life are not always colour-matched and consistent.
They often have elements that are incongruous and garish. So whatever the result I committed to the aesthetic and executed it.
Better late than never the [last] Big Teal Stamp of Approval for 2018/19 and completing some terrain!

Terrain is everything – TT Combat Gothic Ruins MDF kit – the inner sanctum.

Now that the Sanctum Imperialis is complete I should probably be putting this ruin kit in that big pile of projects that were fun at the time but really too much to do just at the moment.
Well I thought there was no harm in laying down some brown where the verdigris would go, I’m not even bothering with Warplock Bronze, it just isn’t going to be seen. Wasn’t sure about the crenalated battlement being coppery…?
I did add a bit of gold into the mix so there was some metallics, not entirely sure I should have bothered with it on the windows – it’s just going to be a pain to do but nevermind.
And inside just a quick coat of cream paint.
Ready for the burnt umber next…
…unless I see sense and leave this and go back to something smaller! 😉

Terrain is everything – Sanctum Imperialis – Home stretch

By the time you read this the Sanctum Imperialis will be complete. All the finials have been painted,

as well as the buttons and lanterns.

Buttons and screens have been done internally too.

With just some select Tamiya Clear to be added after varnishing.

I tried to keep the button colour limited to warm colours, just didn’t want yet another set of colours, it’s already garish.

And, having bust a gut to meet the weekend deadline for the store painting challenge it turned out it is next weekend afterall! Still, having that deadline pushed me to finish so I don’t mind.

Now what…?

Terrain is everything – Sanctum Imperialis – Slow but grimy

This is becoming somewhat of a saga now. I’ve got all the stains to do and the shading but staining all these rivets is incredibly tedious and despite it solving my issues with the verdigris my motivation is through the floor – I think I need to do a separate ‘where’s my head @’ post to get that all off my chest/mind
But I persevered and used my Vallejo Sepia wash and as you can see on the left, where I thinned it the wash split exactly like Seraphim Sepia. However, I was washing it again with black so I was not disheartened, in fact the result is great.
I did a fair few panels before I stopped thinning it with water, it’s a bit harder to work it into the crevices without but I eventually learned my lesson.
There are a lot of rivets and areas that needed shading.
But the sepia followed by Army Painter Dark Tone managed to bring it all back down to an acceptable level.
The big ruin was a daunting prospect though and it took a fair bit of motivation to tackle all those rivets.
Question: do I paint the scrolls either side of the door like paper, or leave them as carved stone relief?
I desperately want this done, the left hand side needs all the Sepia and black which means there are only fine deatailing to do – wires, rebar, glass FX, buttons and varnishes. It’s very close but very much hard work to push it over the line. Just found out this needs to be complete for Friday, as it’s the last May weekend and the ‘large model’ category is due for this month. I had thought it was the next weekend but that’s 1st of June. So I need to crack on now!

Terrain is everything – TT Combat Gothic Ruins MDF kit – Red walls.

In amongst everything else I further procrastinated by getting the  TT Combat Gothic Ruins primed. I had sprayed it black with some cheap £1 store matt black. Then I mixed some black masonry paint with PVA, some of my finest sand and some powdered plaster/wall filler.

This gave me some texture to the flat walls. Red Oxide zenithal base coat was next and then stippling/drybrushing with Vermillion art acrylic.

Shading and verdigris areas to pick out next, hopefully less drama than the Sanctum as I’m far less precious about this.

Terrain is everything – Sanctum Imperialis – I’m getting there, stains n’all

I cannot believe how much this colour choice is challenging me. Luckily after a plaintive appeal on twitter [as well as feedback here] I had enough reassurance from these pictures to keep going.

I mean I still had reservations but folk liked them and ultimately the decision has been made what direction these were going in, that’s inevitable now. It was just actually doing it, like magnets sharing the same poles opposing each other.

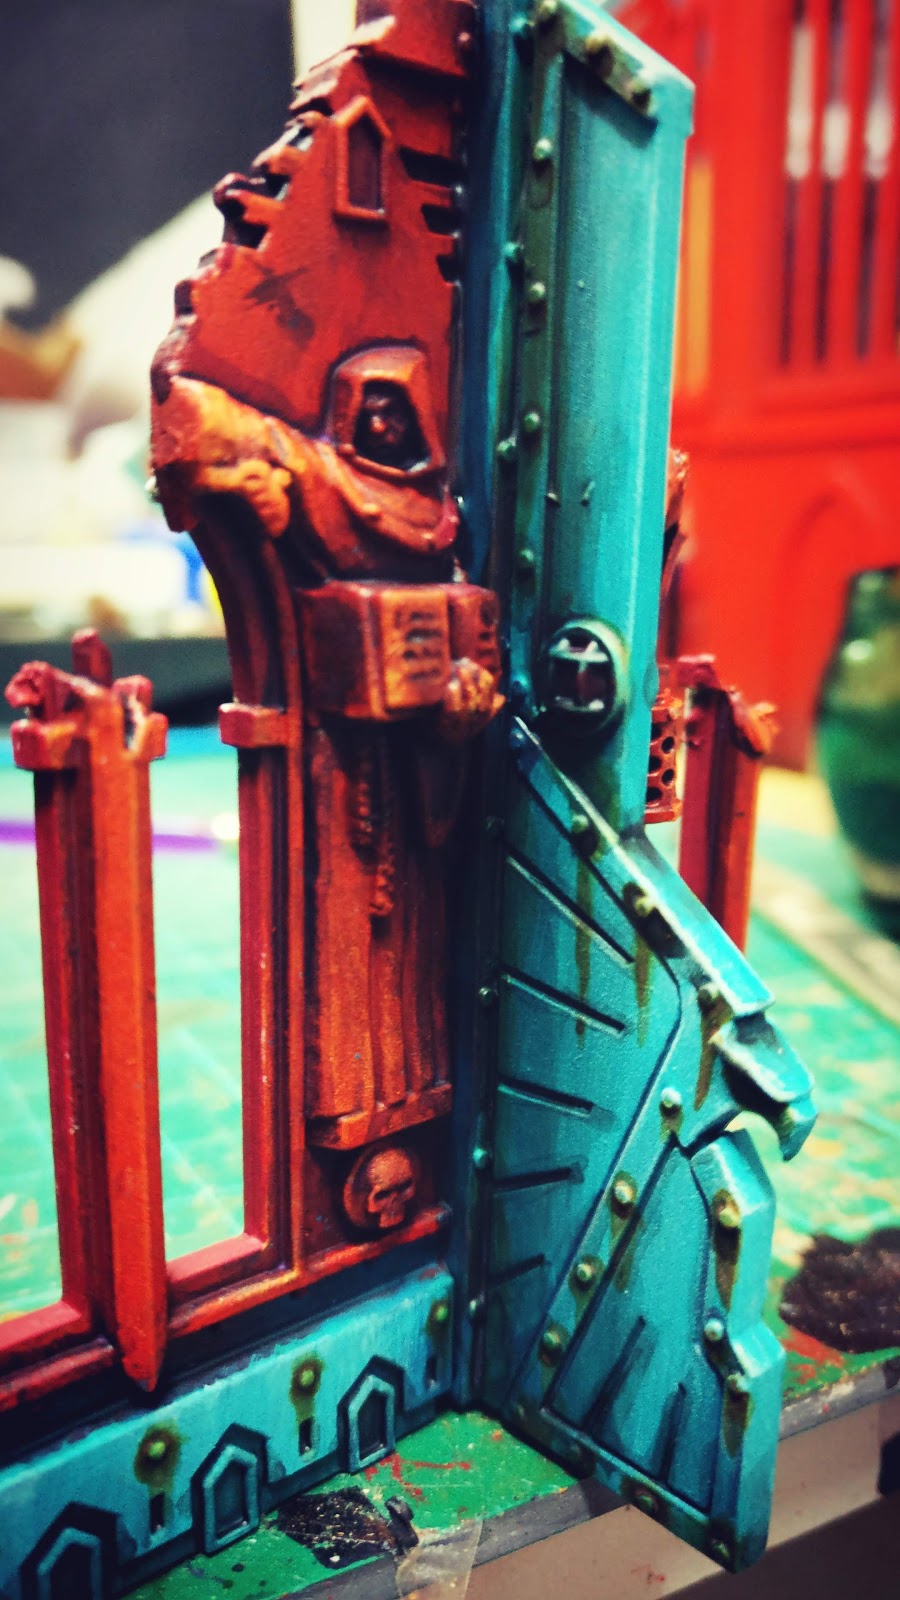
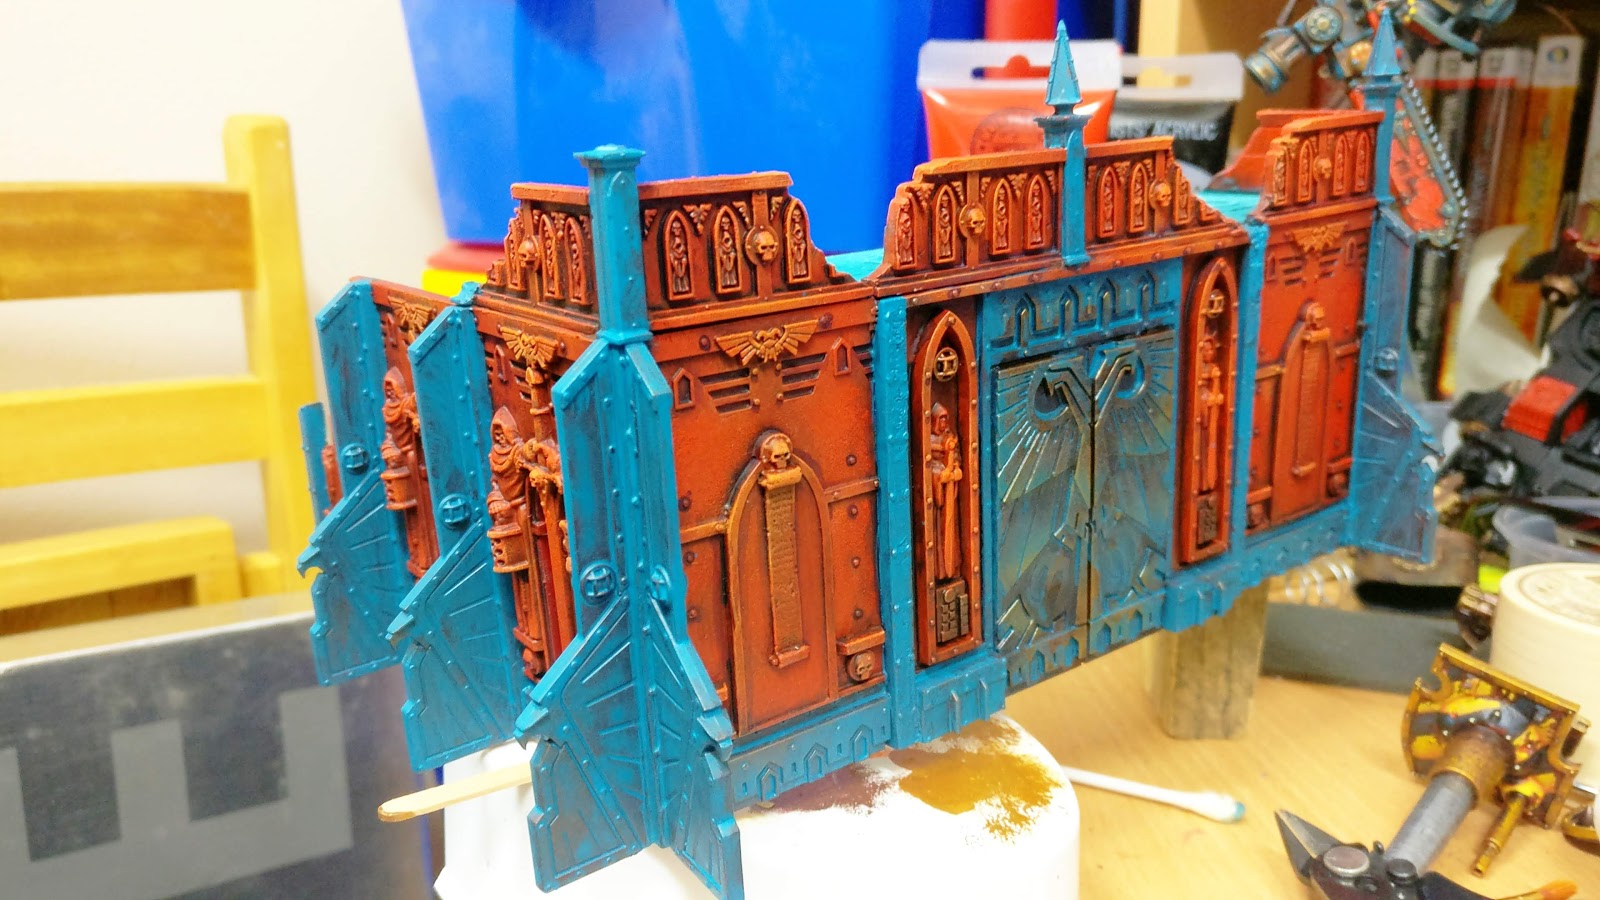
And instead of taking the big piece to this stage I actually took the medium piece to the next stage – adding shading and stains ot all the rivets and edges with the result I am much happier with where this is at now.

Although the turquoise is still very much in your face that shading on the right hand side is working so much better than the non-shaded left in the pic below.

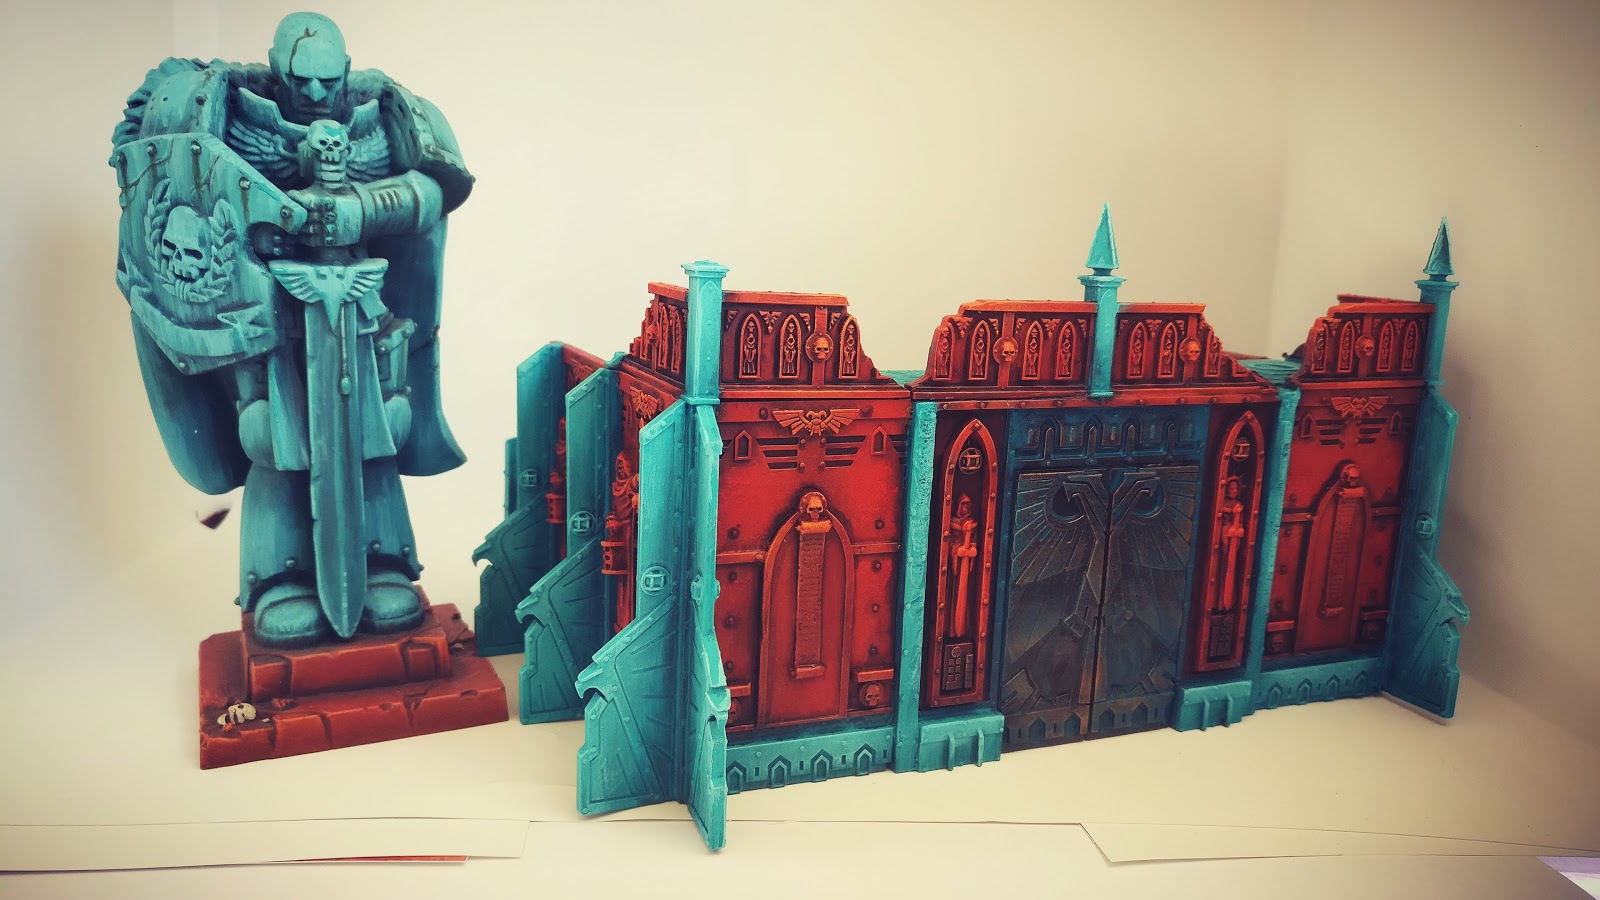
These three sections, plus the front and the two sections from the small corner piece [more on that later] were shaded in one sitting, so now I have a measure of how long that will take.

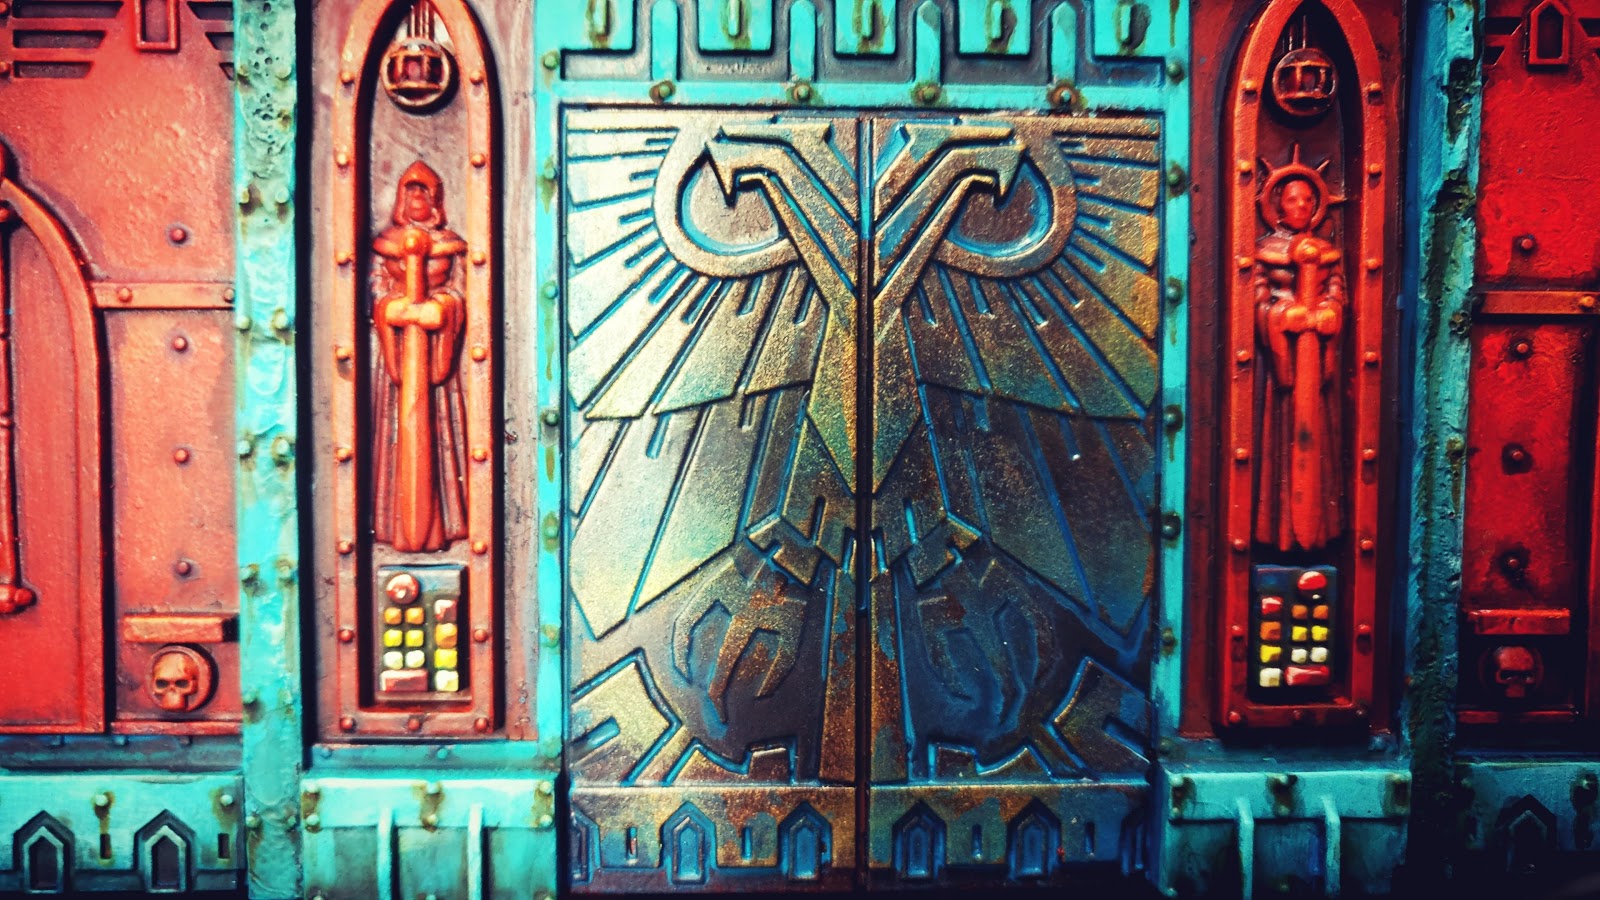
I added staining to all the rivets the next night. I still need to do some addtional shading on it but I needed to pick out the red glass finials on the roof so the shading can be applied to those as well. I also felt the doorframe needed to be more akin to the older copper than the newer brass/bronze.

I also picked out the glass in the buttress lights but I’ve no idea how thats going to work – Tamiya Clear Red X-27 dries super quick and I’m not sure it’ll play well with those small areas. I’ll no doubt have to touch up afterwards…

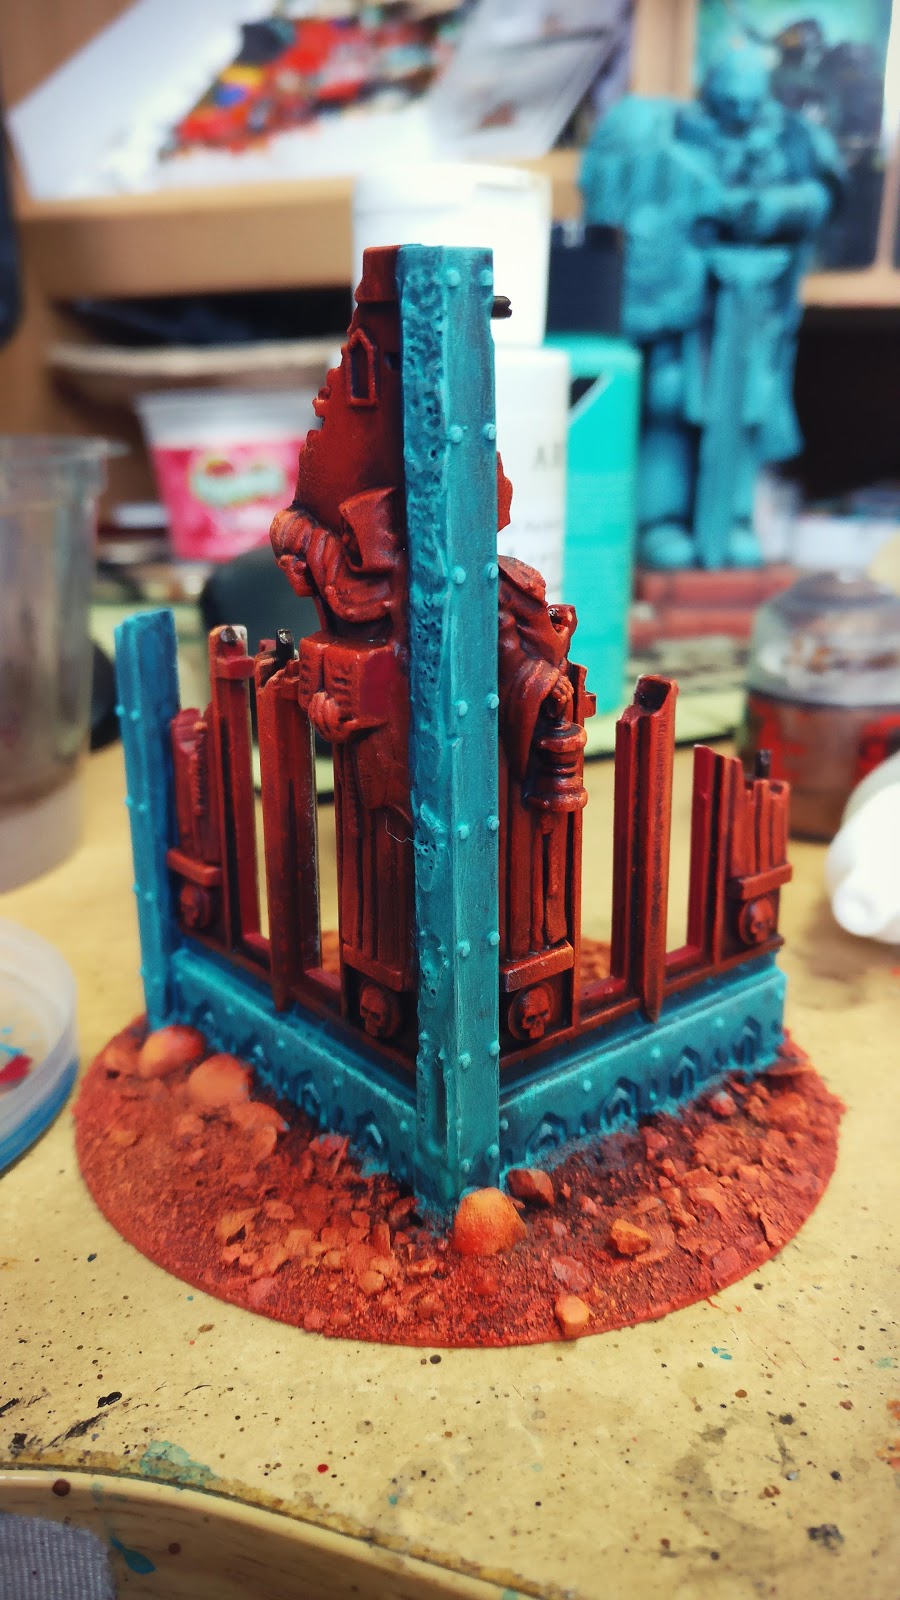
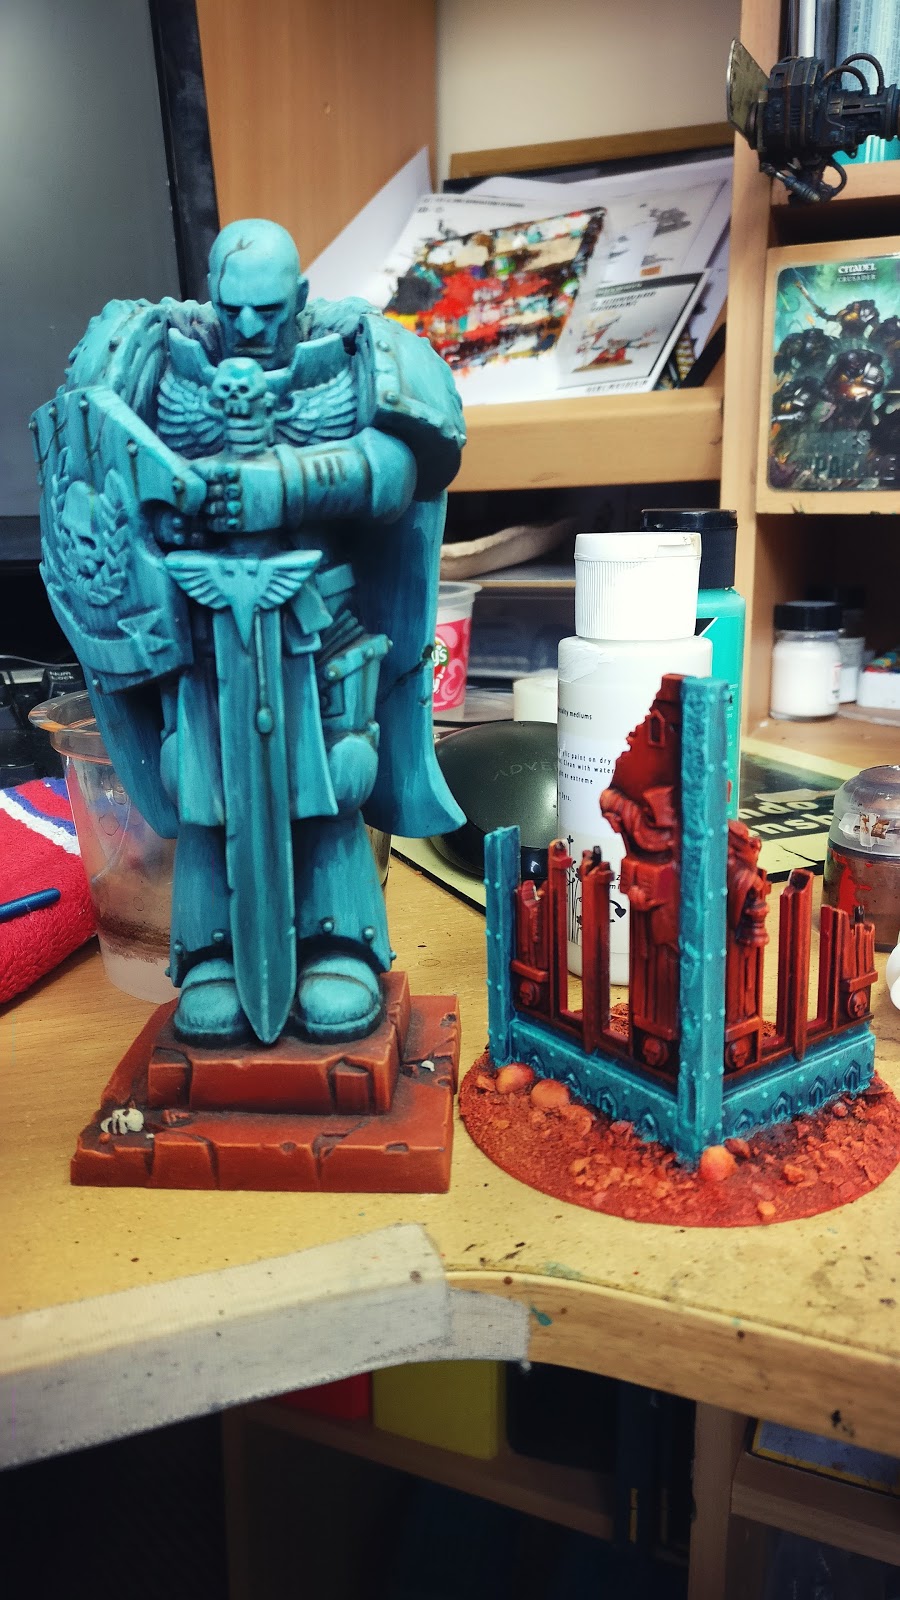
The corner piece got grunged up, not much left to do on this apart from Bonewhite chips on the base and some of the debris inside.

I might have had to tidy up some turquoise smudges, but thinned Rhinox Hide covered the worst of it. I’ll blend some red in so it makes it fully masked.

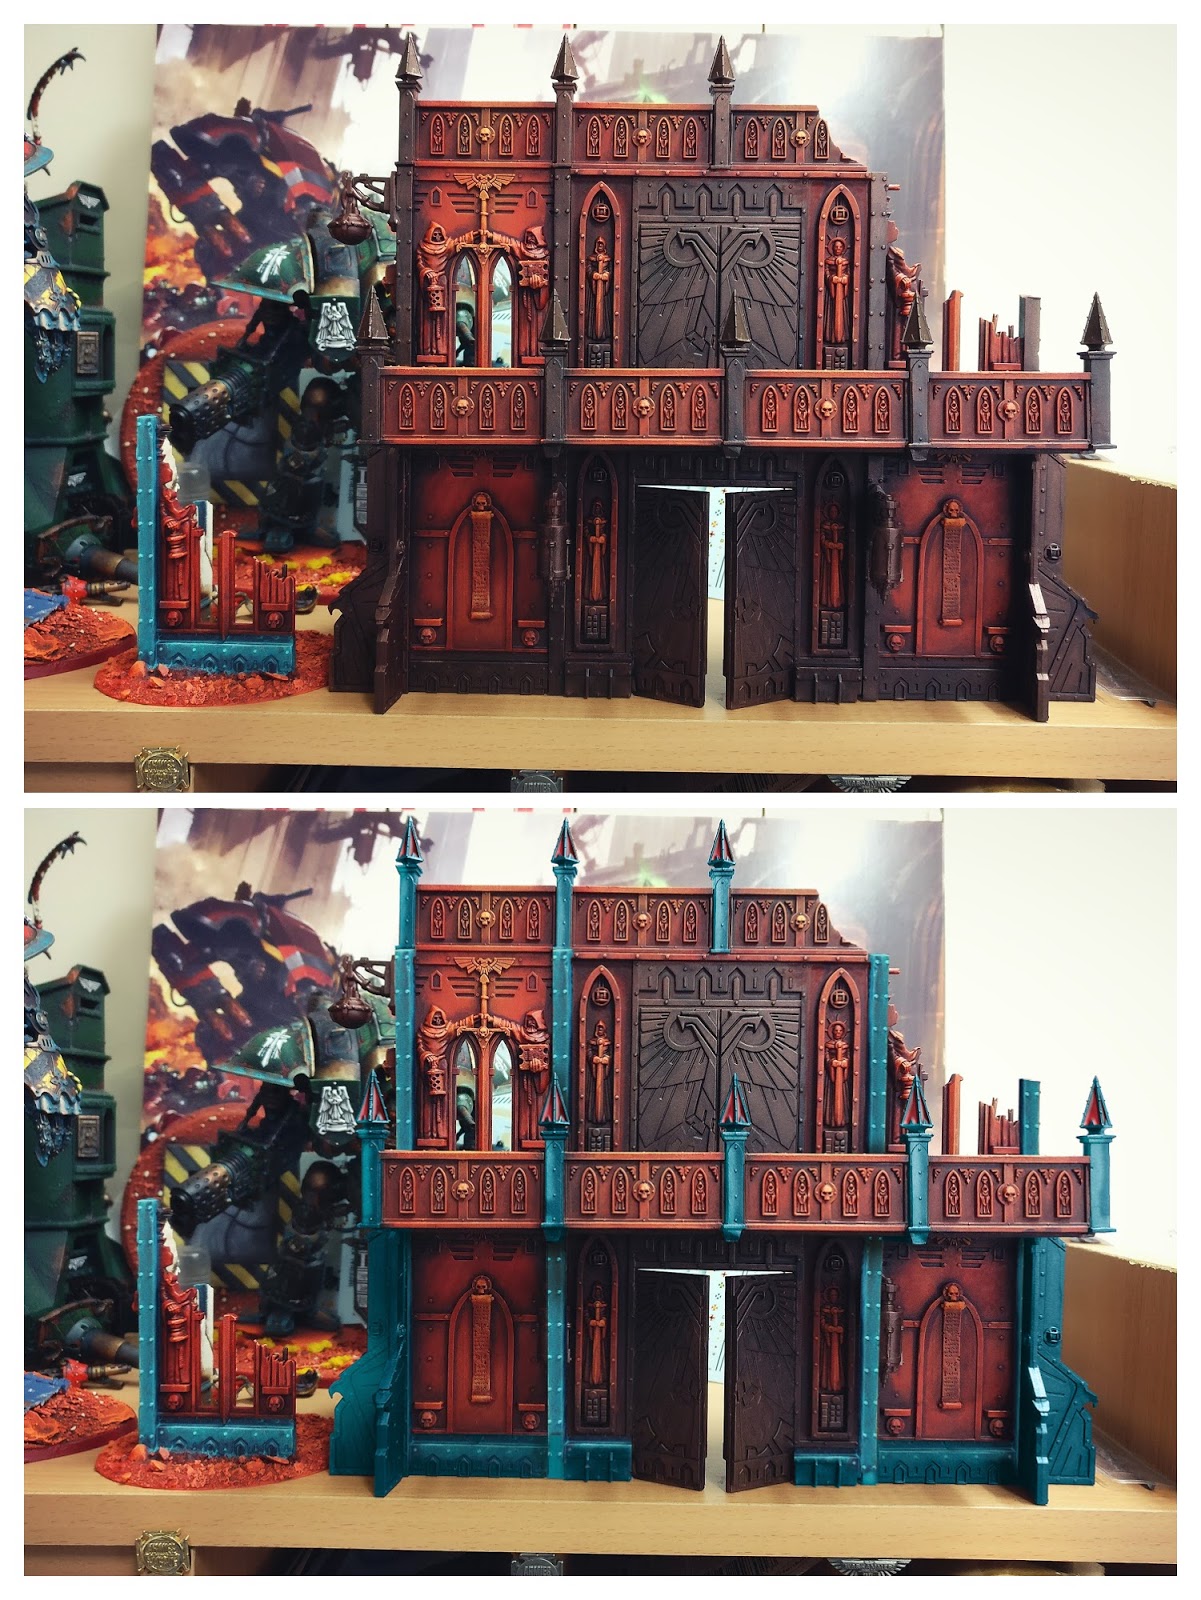
The big piece was also taken to the full verdigris with all the finial and lights picked out. Stains and shading next which is just laborious and will make everything work but because it;s a couple of nights work and I’ve been feeling a bit tired of an evening I’ve just not got back onto it for a couple of nights. Time for another push.

Returning to my Photoshop concept I wasn’t too far off. A little lighter perhaps but I’ve already identified the shading will help tone it down and it’ll better match this when it’s done.

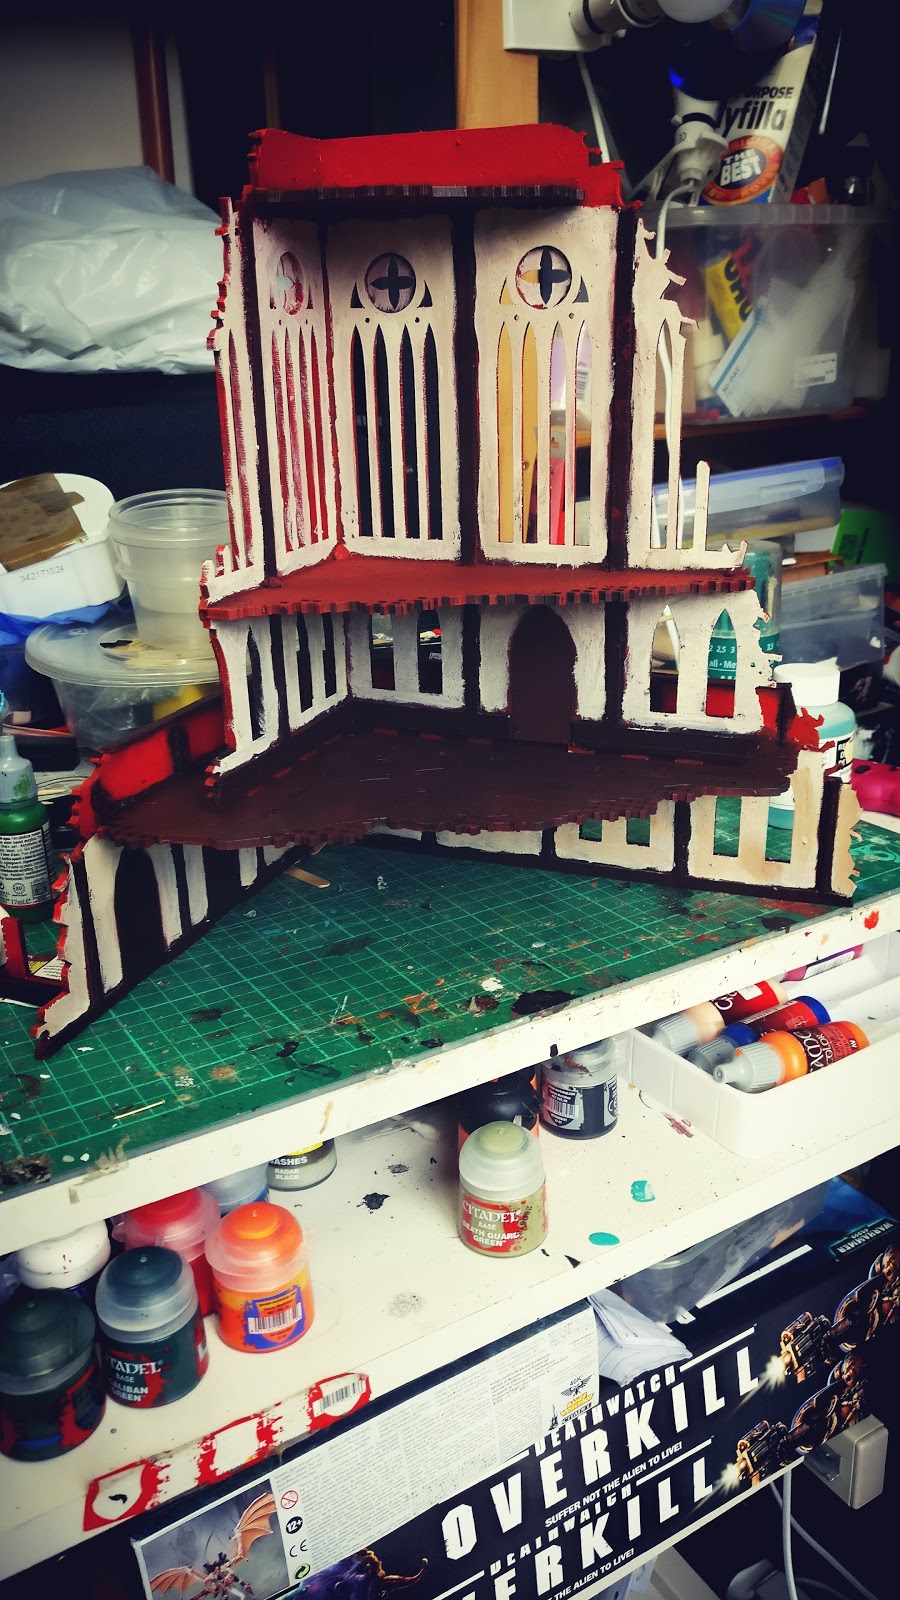
I was reminded the other day that this ruin was built coming up 12 months ago. That sound pretty bad but it’s not like I haven’t worked on other projects or had other prioritiesn not to mention I’ve had longer projects.

It will be nice to get it complete though, it just requires that push on all the shading, then pick out some interior details and all the lights/glass followed by varnishes. I keep thinking it’s half a dozen session’s work or so and at this stage it’s just doing it…

Terrain is everything – Sanctum Imperialis – The blues [greens and turquoisey bits]

Annoyingly I was beginning to stall on this the raw bronze matched the red walls so well with the  cream interior complimenting it all and I was going to throw all that turquoise into the mix?! But before all of that I needed to gild the doors a little so they were a little more brassy/polished bronze. At least that was all I’d hoped it would be.

I’d already gone full verdigris on the roof top. There had been an original plan to do it rusted steel but if I chickened out of weathering the buttresses [obviously I didn’t when you look closely] I’d have explored the effect in the roof at least. Unfortunately, even with my Photoshop mock-up and the reality in my hand I started to doubt this route even more. It was probably what prompted me to build some new figures! The roof is fully highlighted but I’ll be putting some shadow washes on as I’ve been observing some patina’d overhead power cables at some of the train stations on my commute and black shading appears in some areas. Ideally that should have captured by the Warplock Bronze base – at which point we question why I did any of that but I’m a slave to the process…

Ultimately I just threw on the Hawk Turquoise. I came to the realisation I should just not care. If it goes wrong so what? This may well look odd and garish on the battlefield but often reality isn’t always colour matched and complimentary, sometimes things just do look out of place. Failing that I could always repaint!

Having thinned the paint down a lot I needed to paint one side of each of the buttresses and leave it to dry properly before flipping to do the other side or the paint would just bleed everywhere.

A bit of a faff but now I’m ready for the highlights which will be mainly drybrushed so it should be straightforward. Just need to crack on and do it.

Terrain is everything – Sanctum Imperialis – it’s not easy being verdi-green

If you follow the 40kaddict Facebook group you’ll have seen some of these pics already. The plan was always to do full-on verdigris on the uprights, buttresses and external skirting boards, despite adding some highlights to the bronze. First was a wash of Army painter Hawk Turquoise.

Then another wash of my turquoise craft acrylic, followed by another drybrush of turquoise/white mix and I think it matches quite well my Matt Black Hero of the Imperium statue.

But putting it next to the big piece I was wracked with doubt about losing the bronze. It’s such a consistent effect and will not stand out too much on the battlefield – tonal backdrop that does not detract from the miniatures.

But I realised I could Photoshop it to see the end-result and with the small piece rotated I could copy+paste elements across.

I also got to conceptualise the red glass finials, although didn’t add the patina in the door relief. Asking in the group got a mixed response but I think the majority said go for it.

 The patina is my thing and as much as the terrain shouldn’t take away from the models this is a piece in its own right.

If you look around there are always architectural elements that do not fit a single aesthetic. Not everything is designed to be harmonious and share the same palette of colours so I’m going ahead with it… And while I was in Manchester I came across this example to illustrate my point.

Not sure whether it was the inspiration [long in gestation] because they’re just green painted drainpipes, not weathered copper, but you get the point.

So, more turquoise next.

Blog at WordPress.com.

Up ↑

Design a site like this with WordPress.com
Get started