‘nids part 272 – Tyranid VSG part 3

Dreadtober starts tomorrow, but I mentioned the other day I had been sculpting the Tyranid Void Shield Generator and so thought I’d just slip this in before I can start sharing my Dread progress. I had been putting the VSG off, for over 3 years now, purely because I wanted to video how to do some of the tendon bits. I finally did the clip and I desperately want this complete, but among so many other projects Dreadtober included there’s quite a competition for my limited hobby time.

Here’s how I sculpt a tendon:

And static shots from the completed spine in the video.

The inner spine is [almost] complete though.

It’s not perfect by any stretch but after the gloss and Tamiya Clear Red X-27 it doesn’t have to be.

My next stumbling block is how it interfaces with the ground. I was going to use some of the wood chips I used on my ‘ground-bursting’ Trygon but I still need to add some lava stones to look like alien growths. It’s a fair bit of work and not without challenges, hence why it has almost caused my renewed efforts to stall…

The emitter node also needs adding to the pen tube so I can then add veins and whatnot before I then try and sculpt the inside of the battlements. 

The black mark is for one extra tendon that needs to be sculpted in place. I’ve got some concept elements for the battlements – which is an odd situation as in 8th edition the building rules are far more streamlined now with less room for interpretation. It’s still possible to position models in the standard Imperial VSG but nowadays this would probably be considered modelling for advantage. 

I mean I did specifically build it to fit a brood of Devgaunts in but that was perfectly legitimate with the prescribed rules in 7th. Anyway, I doubt it’s ever going to a tournament so it’s not really an issue.

Anyway, not sure when/if I’ll do some more on this, Dreadtober is my focus but I will have some extra hobby time between writing this and it’s scheduled publish date, so I might have one update soonish or none for six months to two years…😂

‘nids part 251 – Tyranid VSG

Almost two years ago now, there was another one of my ‘honestly not’ diversionary tasks while the Dark Angel drop pods failed to motivate me. But what a task to get distracted inspired by – the Tyranid VSG. Although don’t get too excited I haven’t touched it since, I just got sick and tired of seeing the two posts about it permanently in ‘draft’ status.

Anyway, this was just two nights work in 2016 as I endeavoured to fill out some of the fibrous musculature on the containment spine. First of course I had to do spikes which were sculpted to match the Capillary Tower spikes on the Skyshield. I probably should have checked that post before beginning, it might have reminded me how fiddly DAS can be, even when applied to the curtain hook core. The clay kept slipping all over the place and it was extremely difficult to bring to a sharp point it just wouldn’t play ball. I’m sure Milliput or even green stuff would have rendered better results with their adhesive properties.

After the two nights of effort progress stalled. The plan was to at least get the fleshy bits done, possibly the battlements too. However, I planned on doing a ‘how to’ video of the fibre sculpting and for that I need a willing child to hold the phone while I sculpt. The eldest helped with my infamous Chitin panel sculpt that I finally posted regardless of it’s ‘adult’ nature.but I haven’t been able to cajole him to repeat the process. The upside of losing interest in the VSG was renewed vigour on the Ravenwing Dark Talon, then 31 Genestealers, Land Speeder Typhoons, my Imperial Knight and finally back around to the drop pods, ultimately seeing them through to completion. So despite the distraction it actually kickstarted my efforts in the task I was actually trying to avoid… eventually!

Hopefully I’ll one day film a set of fibres being sculpted, but finding time to do it is tricky and I’m otherwise occupied [as I have been for almost 2 years!!!]. Then I can move the spine onto completion and worry about sculpting the battlements or do the interface with the ground…

‘nids part 250 – Tyranid Void Shield Generator – how to sculpt a chitin plate NSfW!

To celebrate my 250th Tyranid post I thought I’d finally publish this ‘draft’ post officially to the world. I originally sculpted and filmed this almost 2 years ago but I know what it looks like and just couldn’t bring myself to share it publicly. I’ve speeded it up to try and make it less ‘inappropriate but dirty minds will out.

All it really is for is helping folk understand that sculpting these plates is not difficult. It takes 10 minutes to do each one and then it’s left to dry overnight. I was also doing a couple of other plates on the sides so a half hour sculpting session in total. It’s not a huge investment in time and as you can see the technique is not difficult but I think the results turn out pretty cool.

The VSG is in hiatus at the moment, I do have a follow up post to this to show the sculpted fibrous inner musculature on the tower. I actually wanted to film that too but haven’t yet but one day I’ll get back to it I promise, until then you now know the secrets of it’s xenos construction.

It’s a Tyranid Skyshield Landing Pad…

Funnily enough I can never seem to find a complete ‘To Done’ showcase of my scratchbuilt Tyranid Skyshield Landing Pad. The best I have doesn’t feature the walls/petals, they hadn’t been completed at that stage. In all honesty these aren’t great pics but I needed to take some for the monthly Warhammer 40,000 painting competition.

This month it’s ‘Terrain’ and there’s a quite frankly insane spaceship diorama but I thought I’d throw my hat in with the old Tyranid Trampoline.

Currently I have no urge to use it in my lists as 8th has made even my backfield defense of Tervigon and Termagants far more mobile, or at least I feel they need to be on the move as a support for the other elements moving forward.

It’s not how I’ve played for years but probably far more in keeping with how Tyranids are supposed to behave. I could be wrong though, maybe these are ace in 8th but I doubt it, and here’s the evidence:

 They took a price hike and only convey a 5+ invul save compared to 4+ in 7th. What’s worse is it now has a wound and Toughness profile and at T7 can even be plinked by las-guns on 5s. 

Sad thing is they’re not likely to get a ‘Codex fix’ either as they currently sit in the Imperium Index 2 and I doubt any of the Fortifications will see changes, at the least it won’t be until ALL the Codex are released 😦 So it’s going to be a very considered choice to take this to any sort of tournament.  

It’s only justifiable purpose now would be in support of a painting competition entry – modesty aside, it’s one hell of a centrepiece, but in most of the tournaments I’ve been to it’s made an appearance so perhaps it’s time to go into hiatus…

On the plus side it was a nightmare to use in game and always a pain to transport, pack and then re-pack. I can’t say I’ll miss that.

But it looked awesome in the battle reports and despite it’s awkwardness was often handy to transport the Tervigon and 30 gaunts from table to table – it was it’s very own tray 😉

Still, at least taking these pics gave me a chance to patch up some of the paint chips on it 🙂

And when I put the Tervigon on it for scale, made me realise this Tervigon is my favourite model, of possibly everything I’ve done.

‘nids part 194 – Tyranid Void Shield Generator part 8.

Second side plate completed. I think I’m getting the hang of this now, I mean it’s not the most amazing sculpting, it’s pretty basic in fact but it’s a level I comfortable with, both in results and effort involved to achieve it.
 

I know I could achieve something similar with a tonne of hot glue and some simple haousehold rubbish but I wouldn’t be happy with it. Whereas this aesthetic is a bit more involved but not too much I’m rendered motionless by the weight of the task at hand.

The fourth spine plate was done too.

This was the progress night before Throne of Skulls, side plates complete and spine done.

Next up containment spikes on the spine.

Then fleshy bits on the spine interior and the battlements.

I’d been musing on the battlment base, It’ll be similar to the Skyshield but the VSG stamen will hopefully look similar to this, the centre of a pumpkin flower.

Although it’ll be red, like this.

‘nids part 193 – Tyranid Void Shield Generator part 7.

This work was all done before Throne of Skulls, managed to get the third Chitin plate done

and the flesh joints between the smaller spines.

They’re really quite effective.

Looking forward to getting the side plates done next.

Fourth spine plate done.

I’ve actually got a video of how to do this which I may share…

First side plate, really pleasesd I went with the flesh join I;d originally intended for the Bastion and not the flush join I eventually did

I can’t wait to see this painted up.

Final Chitin plate and two side plates still to do.

‘nids part 191 – Tyranid Void Shield Generator part 6.

I know what you’re thinking, this is not a Dark Angel Tactical Squad… ahh, the best laid plans of Gaunts and Rippers… so I write my confession, plan ahead for what I’m going to do next and then immediately go for the thing I wasn’t going to do. But when the muse is upon you it’s always best to go with the flow. So I just decided to do this because even if I pause halfway through the sculpting there’s stuff done when I was compelled to do it.

That said I may have rushed some bits and the focus spine isn’t too pretty but I think the painting will hide a multitude of sins.

The ectra chitin plates came out really well though. I’m sure I’m missing something in the technique from the Capillary Towers and the Bastion as it feels too easy. Maybe that’s just the familiarity of the process I don’t know but it was so easy it felt like I’d missed off part of the process or the previous sculpts were harder.

I also cut and gouged the foamboard battlement ‘rooftop’ and in so doing sliced through the bottome board. So I applied a thin coat of clay, to stabilise it and create a more rigid platform to apply whatever sculpt the Hive Mind sends me. This process was actually the first thing I did and potentially killed the nights efforts altogether, that said it was about 45 minutes to an hours work to do this.

The following night I ummed and ahhed about continuing down this path but it means I can work indoors and I do my bit, pack up and go to bed earlier – I managed pre-midnight both nights and perhaps with a bit of effort I can manage 11 o’clock!

So the two smaller plates were completed,

and the second spinal plate. I’m trying to bulk it out, because I thought the spine looked a little anaemic and hopefully the more clay I use the more durable it’ll be.

I’m taking it slowly, so I don’t smoosh up what I’ve already achieved, another 45-60 minutes and it’s left to dry overnight. With four plates left to do I will probably continue on this for most of the week and get as much done as I can. Then hopefully I can start back in earnest on the Tactical Squad, like I promised. I can foresee getting this to basing/undercoating stage and then putting it on hold as painting it will take a fair amount to do and I’m far more interested in my other tasks being completed, even if this has just jumped the queue spectacularly.

‘nids part 185 – Tyranid Void Shield Generator part 6.

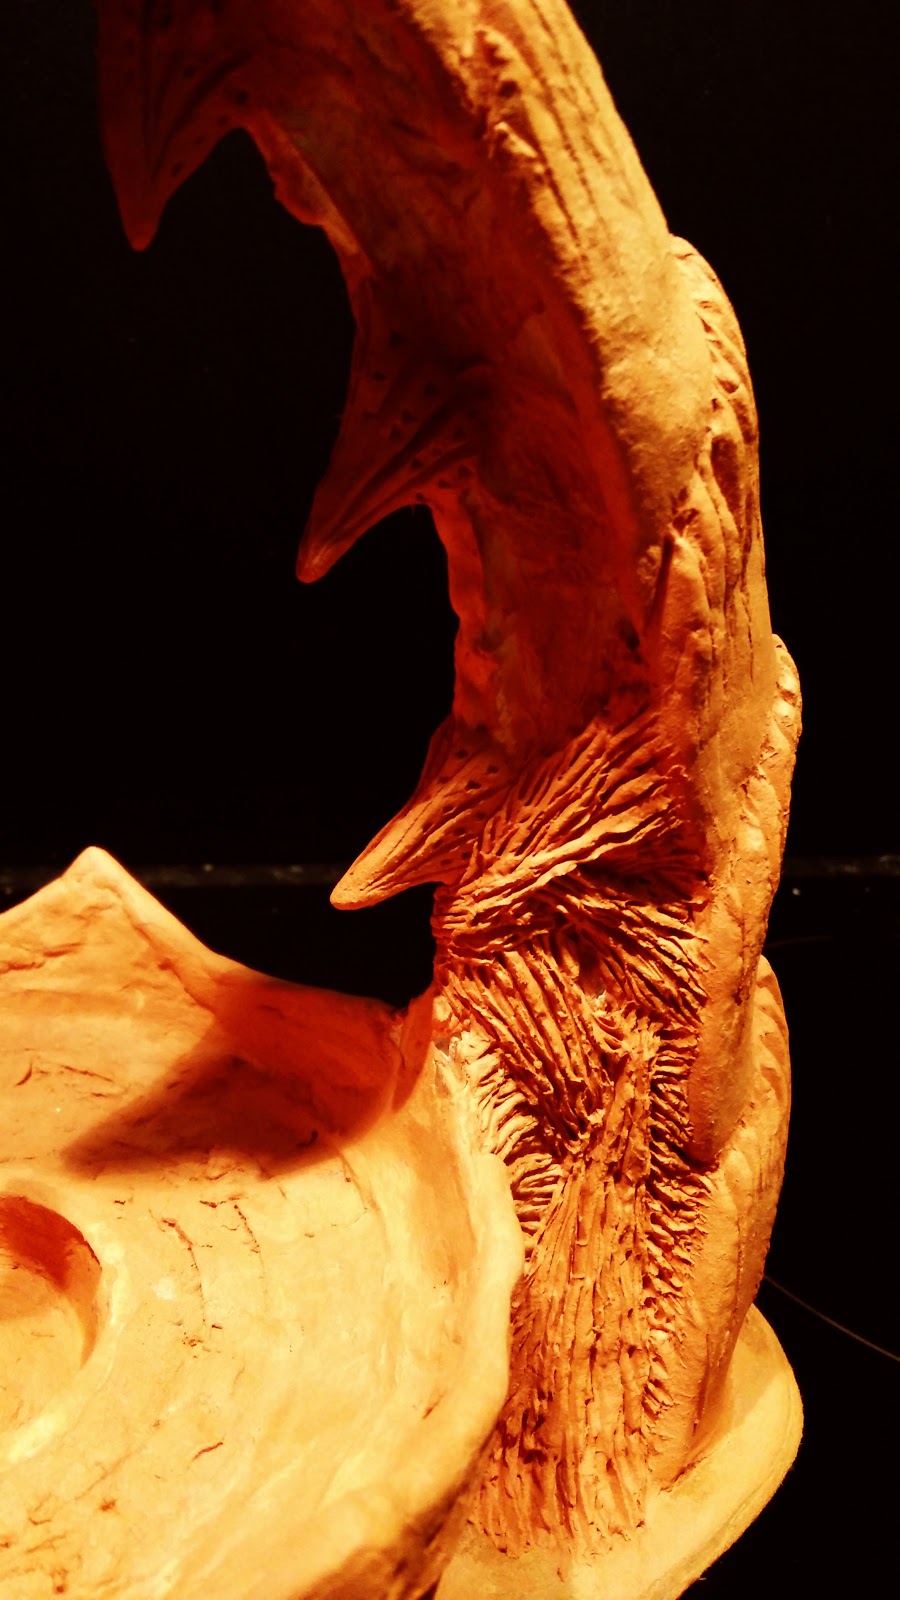
As per my previous nid scratchbuilds it’s time to ‘ice the cake’! I got some tile adhesive and grout, the sort that’s in a tube, this helped with application as you can just squeeze it on and smooth it with some water.

In some respects it reminded me of this 3D printed concrete castle.

I did find the application a little difficult in some places, I probably should have just lightly sanded the plastic to add a key for the grout to fix to, insetad it kept sliding off.

BUt the tube applicaiton is really quite effective and if you want a quick VSG and your sculpting skills aren’t great then I see no reason why you couldn’t stop right here.

Obviously I have an aesthetic that I’m trying to match on my previous builds, so that’s not an option for me. But, I think those shapes and effects are pretty effective so it’s a quick win otherwise.

Sadly I’ll be sanding a lot of this texture off so I can have a flat base for the air drying clay.

But the sanding will clean it all up and allow my to try and build the spire properly, it’s a little thin, except for the base.

The inside was also ‘iced’ but I need to remove the top layer of card on the foamboard for when I sculpt that, which may interfere with the grouting, perhaps?

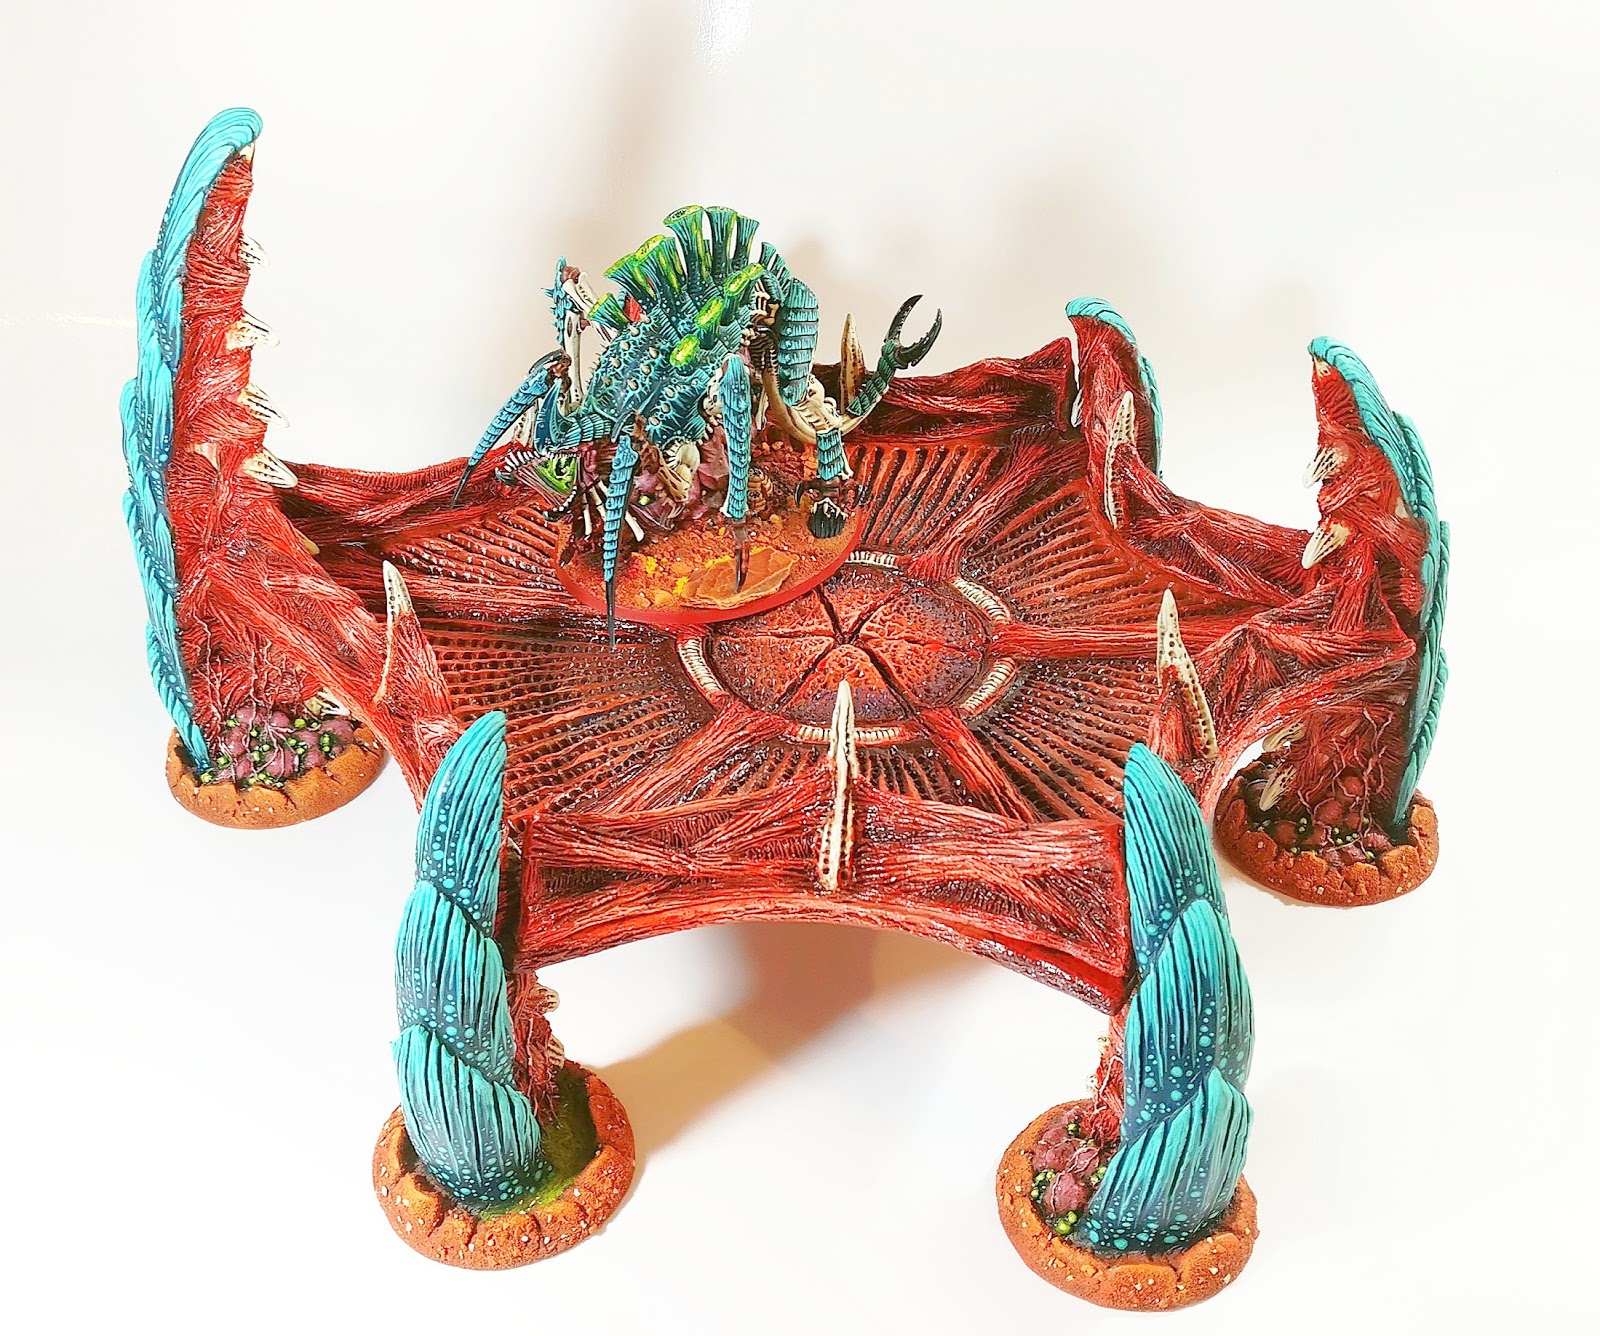
Lastly, just wanted to illustrate why leaving it at this stage is a possibility – a termite mound. As you can see this finish is perfectly natural. Just because a lot of the Tyranid aesthetic follows a similar style to Giger – with patterns, ribs, stomas, chitin plates etc. Things can be far more organic for nids and that means random form, without all those identifiable elements.

It’s for that reason I love the possibilities in Tyranid terrian and structures. I may well have pigeon-holed my approach, made it convoluted and reuiring a lot of effort and a modicum of skill. But that does not need to be the case, anyone can make these things, all it needs is the will, the time, the patience and a variety of easily sourced materials. The great thing is you can’t screw it up – nature’s not perfect. And it’s really cheap to do, the original Void Shield Generator cost a pretty penny and having sold out cost a damn sight more. This has cost me £2.49 in grout, some foam card, a couple of lemonade bottles, a piece of MDF a few curtain hooks, paper towels, a plastic pencil tube and a noodle dinner costing 99p, the majority of which I had already anyway and were either rubbish or recycling! More importantly though, if GW aren’t going to show some love for Xenos terrain, then its our duty to do so.

‘nids part 184 – Tyranid Void Shield Generator part 5.

With these scratchbuilds there are a number of elements that I would consider ‘obstacle to progress’ but in reality are actually quite simple tasks that only require an evenings effort to achieve. As such that should be quite rewarding – I fill all the plastic out with PVA’s tissue paper and by the end of the night the job is done the next part begins and I should be happy.

Unfortunately I have to get through the tissue and PVA process, which is yucky and I don’t like it so it becomes a hurdle but in this case I was still motivated from overcoming the chitin plate obstacle and hopefully the momentum will carry me through the icing and sculpting stage too. As you can see I was a little creative with the tissue, using an old brush cleaning paper towel that really was only good for the bin but I’ve been using it for so long I thought it better to enshrine it within the structure.

I did use a load of tissues that came from a coffee shop which mashed up much better in the water and PVA. I guess there really is a difference between tissue and paper towel consistency [I know how obvious that sounds, but it’s worth noting].

You can really see the difference on the other side of the spine, this has become more like papier mâché than glued paper. I’m going to be covering it all up anyway so it doesn’t matter but if your sculpting skill aren’t great that’s two different option of how to detail your model. The paper towels make an effective musculature, I’m sure with a few successive coats of PVA you could easily just paint it red, cover it in Tamiya Clear Red X-27 and it’d look awesomely disgusting. Alternatively the tissue makes a different, more mineral looking finish that could be equally effective.

The smaller supports will also have fleshy joins to the main battlements. This is something I considered on the Bastion but never did, having the bone walls join directly to the Chitin towers, but for this I’m going to have exposed flesh between the armour plates and the walls.

And just because here’s a close up of the paper towels, that really looks like some fibrous meaty musculature. You probably could even get away with not painting it, it’s already got some crazy colours going on.

And again at this point I’m wondering should I have prepared the second one…? Next up – lets ice this sucker!

‘nids part 183 – Tyranid Void Shield Generator part 4.

Well this just happened! With all the mixed feelings about my other projects every time I enter the shed I’ve seen this thing languishing on the shelf. September was the last time it got any attention, although there were other things that definitely took precedence to push it down my list of priorities.

Now it should still be low down on that list but I just needed to do something and as the plastic forms for the Chitin plates are actually one of those ‘obstacles to progress’ I regularly suffer from if I actually felt the urge to overcome this hurdle then I would be a fool to ignore where my mojo will take me.

I think that’s one of the advantages of having numerous projects on the go, when one gets tedious it’s really easy to switch to another project to mainain momentum. As it was I couldn’t quite remember how to do these [I’ve done 10 spires so far!] so it was lucky I had a blog to go back for reference. I think the main spine is a bit ropey in places but the smaller ones came out pretty well and the hot melt glue didn’t melt too much of them.

I drilled out the emitter ball too, I’ve found the second one so should I want to make another VSG it’s possible, alhtough I’ll kick myself for not doing the two at the same time…

There’s a curtain hook for the very tip of the spine and I’ll be adding more down the inside. I put a Genestealer on the battlements for scale too.

All good fun, I need to pack out the plastic with PVA and tissue next, then a coating of tile adhesive/grout. I don’t envisage this replacing any of my other projects but it’s nice ot take a break so I can make progress on it and return to the other ones afresh.

Blog at WordPress.com.

Up ↑

Design a site like this with WordPress.com
Get started